Installation of UUC Shortshifter in E28
Here are some pictures of the installation of a UUC Short Shifter in an E28. For more information on the shifter, see UUC's web site at http://www.UUCMotorwerks.com.
You do not need to drop your drive shaft or exhaust to install this kit!
Use these instructions along with those supplied by UUC (which you can download off their site).
you can click on a picture to see a full sized version which might be useful to see more detail.
there are more details about the installation at the bottom of this page...
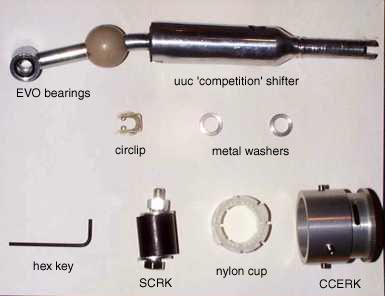
First, here are the bits and pieces you get with the UUC shifter. Also shown is the Sheet Metal Console Repair Kit (SCRK) which is recommended for E28's with the sheet metal console as opposed to the aluminum carrier. These instructions are for sheet metal console installation. |

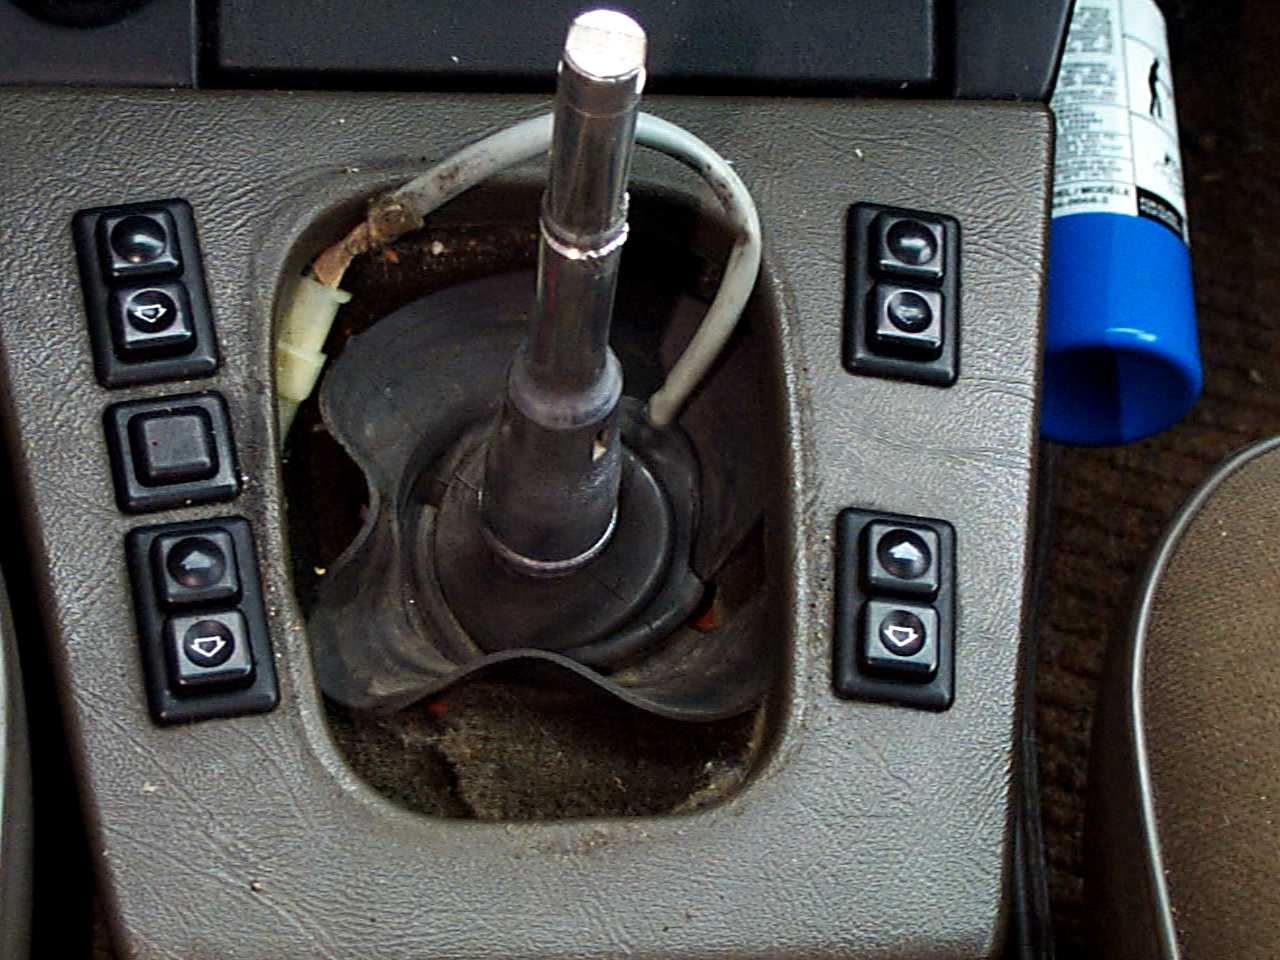
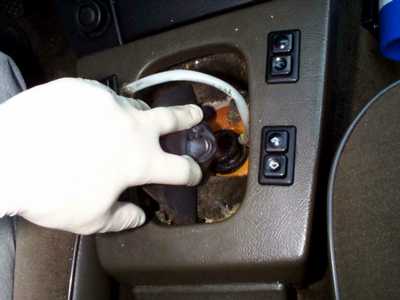
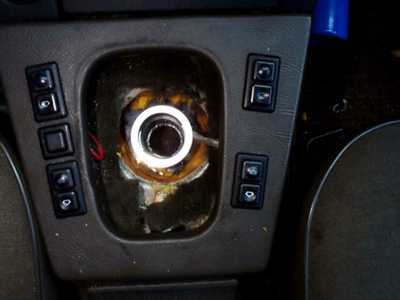
Step 1: remove the shift knob by pulling it off (sometimes you need to pull VERY HARD - be careful you don't hit yourself in the head!). also remove the boot. This will reveal some insulation which you can just pull out and you should see this. this is the rubber boot which sits over the sheet metal console. lift up the sides of the rubber boot as shown. place the shifter in neutral. |
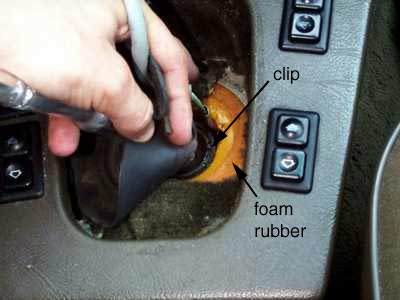
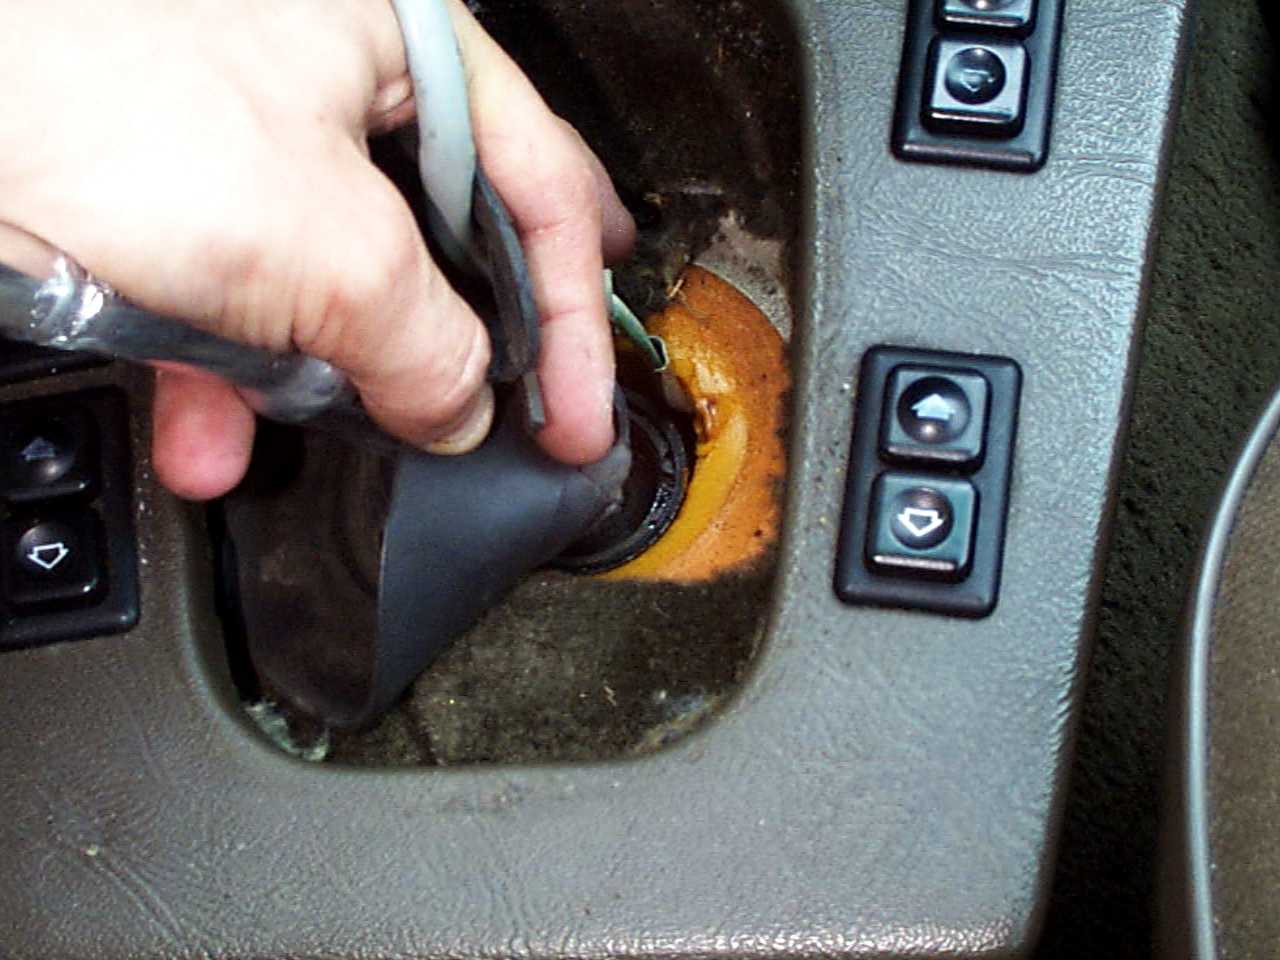
Step 2: if you lift up the boot you will see a circlip which holds the shifter in place. also shown is the orange foam insulation that sits around the sheet metal console. it is helpful to remove the foam to install the CCERK (later). remove the circlip with clip pliers. |
Step 3: with the clip removed all the bits that hole the shifter in place will come out but remain on the shift lever. you'll now need to get under the car to remove the shift rod from the lower bushing in order to get the shifter out. |
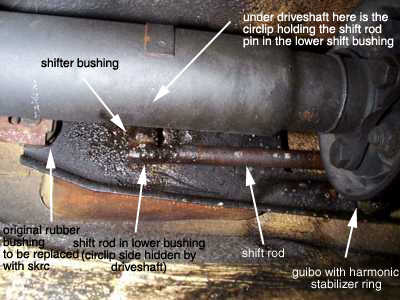
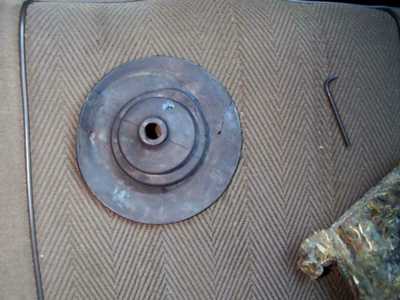
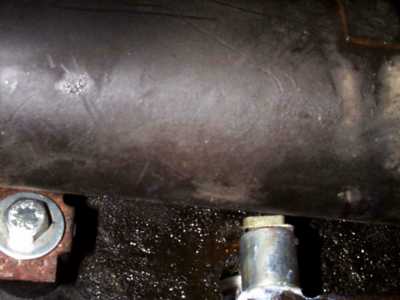
Step 4: under the car, you will see this. you must remove the circlip holding the shift rod pin in the lower bushing. it is usually possible to remove the circlip with your fingers. see the instruction from the uuc web site. |
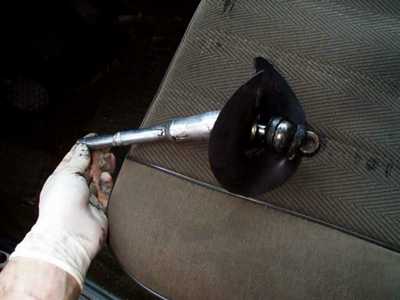
Step 5: when you get the pin out of the lower bushing, from the inside of the car, you can just pull out the shifter. here it is removed. in order to remove the rubber boot you may have to rip it to get it off. you can try using some lithium grease to slip it over the shift lever but it might rip. the rip can be repaired with some cyanoacrylate glue (crazy glue). |
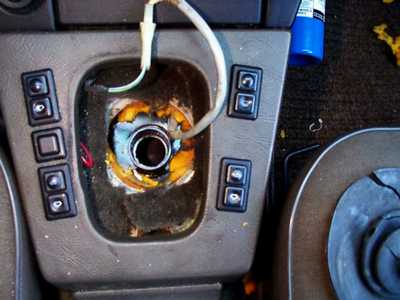
Step 6: now you will need to rip out the orange foam around the shift hole. you need to do this to install the ccerk. if you don't have a ccerk then don't rip the foam out. the foam needs to come out so you can get at the set screws of the ccerk. you can pack the foam back in there when you are done so don't throw it away. |
Step 7: here is the shifter cylinder with the ccerk installed. the slots of the ccerk should be at 3 and 9 o'clock. the nice thing about the ccerk is that it converts the car to use the newer nylon ball cup (see first picture).
|
Step 8: now is the time to glue and rips in the rubber boot. you can leave the rip needed to get the boot off the old shifter open until you put it on the new uuc shifter, then glue it together. |
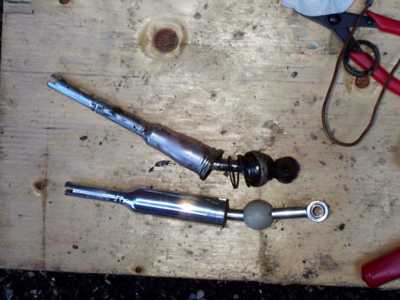
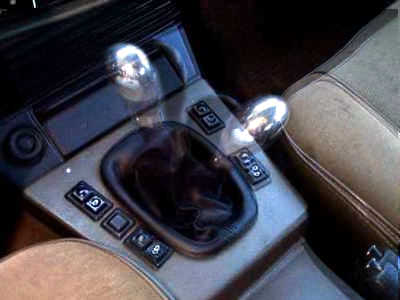
Here is the old shifter beside the UUC 'competition' shifter with EVO bearings in the bushing. Note the radical geometry difference. I installed the 'competition' against UUC's recommendations so keep in mind that if you go with the 'competition' it will be a lot more difficult to shift and will be very notchy. if you just want a slightly shorter shift but with the whole installation tighter, go with the 'street' version. read everything on the UUC site in order to decide. i'd go with the EVO bushing. the ccerk may not be necessary with the 'street' but it will upgrade the shifter console to use the newer cup, reduce the amount of force required but most importantly keep the shift rod from hitting the guibo. its probably worth the extra $100. you decide.
|
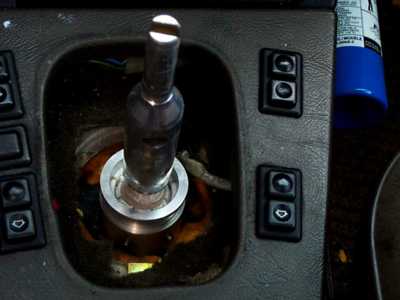
Step 9: from the top, place the set screws in the ccerk to get them started. place the ccerk over the console cylinder with the slots aligned properly. you will have to take the supplied allen key and cut off about 5mm off the short end in order to get it into the tight space to tighten the screws. place a drop of locktite on the set screws and tighten in place. don't tighten too much, just enough! make sure the ccerk is seated all the way down on the console. then, push the shifter ball into the nylon cup and push the cup into the ccerk with the tabs lined up to the slots. you might need a screwdriver to push the tabs down into the cup so they engage in the slots. make sure the angle of the shifter is pointing to the rear of the car.
|
Step 10: under the car, put the shift rod pin in the bushing of the shifter with the supplied washers in place as per the uuc instructions. if you got the evo bearings be careful not to push them out. if you do, take the shift rod out and reseat the bearings. move slowly. i put some grease on the pin just to keep moisture out. push the circlip on - you can use your fingers. also shown is the scrk replacing the original rubber mount. i'll cover the scrk on another page (it requires some explanation). |
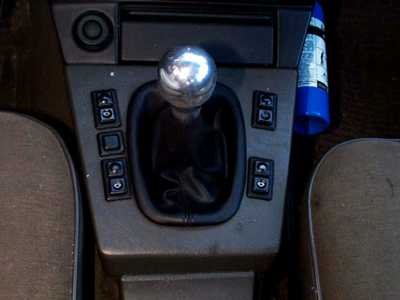
Step 11: from the top, press the clutch and try shifting into all the gears and reverse. if everything is ok, put the foam back in. put the rubber boot over the shifter and glue up any rips. make sure everything is nicely in place. put the insulation over the boot and top boot over the shifter and snap into place. install your shift knob and voila!
|
|
BEFORE (3rd to 4th)
I forgot to take a picture of the stock shifter so i had to recreate it. this is pretty accurate despite the deformed look of the shifter. my original shift from 3rd to 4th as shown was 170cm.
|
 < <
AFTER (3rd to 4th)
The UUC 'competition' shifter reduces the shift to about 70cm, more than 50%! but remember, the 'competition' might be to aggressive for most drivers so you might want to go with the 'street' which will give an equivalent reduction to about 115cm. |
Installation Time
The installation of the shifter took surprisingly little time. With the car up on jack stands, the installation took about 1.5 hours. I had no difficulty with any part of the install. The circlip was very easy to remove with my fingers; the new circlip took a little more effort but it was just a matter of getting the right leverage on the clip, again by hand.
The SCRK was another story. It took me 1.5 hours to get that bolt in there! It was one of the most frustrating things i've ever done and frankly, i wouldn't advise you do it unless you really really want to. The problem was that there was very little space at the top where the nut goes. It was brutal getting my fingers up there and trying to turn the bolt to engage with the nut. I would have given up and tossed the whole thing in the can but I had to damage my original bushing to get it out.
On that, the original bushing was fine. Both nipples were in good shape and it was in there solidly. I had to cut the bottom nipple off and grab it with a pair of pliers VERY HARD to get it out.
Granted the SCRK does make the console more solid but if your bushing is in good shape and your console is in the same configuration as mine (and not as UUC shows it) I would advise you just leave the original bushing in there, unless you are a masochist.
After I did the install, I wondered why it was so difficult. I took a look at the sheet that UUC supplies and I noticed that the configuration of my console and bracket was different that what they show (see below). As you can see, if things were set up as shown by UUC it would have been a lot easier. So I advise that you check this first.

How to Tell if You Have A SM Console
The easiest way to tell is if you have a pre-85 car you most likely have the sheet metal console. Want to be 100% sure? take off your shifter boot (you can leave your shift knob on) and remove the insulation under that. Take a peak with a flashlight under the rubber boot. If you see a black piece of sheet metal with a the shift lever going through a cylinder, you have the sheet metal console. If you see an aluminum arm with the shifter going through a hole you have the aluminum carrier.
The next step, knowing you have a sheet metal console, is to check the configuration of the bracket and bushing to determine if you should get the SCRK. Study the diagram above and then crawl under your car and check it.
It is possible that my car was modified. I'd like to know why my car is different than what UUC shows.
What Does it Feel Like?
VERY DIFFERENT!
Now, keep in mind I put in the 'competition' shifter. I asked many questions of the people on the message board and Rob Levinson. Rob advised me to get the 'street' because ultimately my car is not designed for the 'comp'. The result, he advised, would be much more effort would be required and it would be very notchy. I spoke with one guy who put in the 'comp' in his 84 528e and he liked it and gave me details that were in sync with what I wanted to accomplish with this mod. But, I agree with Rob, its definitely not for everyone. So, if you are looking for a shorter throw but don't want to dramatically change the feel of your oem shifter, get the 'street'.
I had to pay and extra $100 to get the CCERK in order to reduce the effort required with the 'comp'. I can't imagine what the 'comp' would be like without the CCERK - it would be impossible to use!
Finally, the shifter will exacerbate any problems with your tranny. For example, I have worn synchros especially in my 1st and 2nd gears. Downshifting into those gears is very difficult and in some cases impossible going into 1st. Again, the 'comp' will amplify these problems more than the 'street' and another reason i'd recommend the 'street' to most people.
Ok, so how does it feel? Its definitely shorter as can been seen in the picture. Shifting feels like flipping a switch more than moving a shift lever. Its very fast. It takes some getting used to the extra effort required with the 'comp' and I find that using the weight of my Rob Knob to help get into gear is helpful, but obviously takes a different shifting technique. My shifting is MUCH smoother and I can find 5th easier. With the shorter throw, the smoother shifting and the shorter clutch throw (via the Clutch Stop [below]) I can now accelerate without any of the mechanics of it getting in the way; that is, I accelerate faster. It also makes the car feel sportier and is more fun to drive.
The UUC shifter exceeds my expectations.
The Clutch Stop
Using the UUC shifter in combination with the Clutch Stop completes the efficient shifting modification. The Clutch Stop allows you to set the point at which your clutch pedal stops - it doesn't need to go all the way down. Its a simple replacement of the oem pedal stop and well worth the $.
Is All This Worth It?
Good Question! I'd say, yes, marginally. The UUC parts are very expensive in my opinion. I paid $20US for the SCRK, $20US for the Clutch Stop and $300US for the 'comp' shifter with the CCERK. I also bought a Rob Knob of $65US. With shipping to Canada it came to about $650CAN. I'd say, for me, fair value would have been around $500-550 - so the price isn't too far off. Granted, I was totally impressed with the quality of the machining and I appreciated the time and effort in the R&D of all this stuff. It must have taken UUC a lot of time to get it right - all these components are built to get it right. The amount I paid is at the top end of what I would consider fair value, so the bottom line answer is YES, they are worth it.
You will save money if you get the 'street' without the CCERK and EVO bearings. That configuration should be good enough for more people. I'd spend the extra $40 on the EVO bearings however because if you are going to put the $ and effort into putting this mod in, you might as well go all the way in terms of quality. The EVO bearings will assure that your lower bushing doesn't wear or distort. The oem bushing was very distorted causing extra play in the shift pin. The 'street' with evo bearings is $195US and that's a pretty good price for what you get.